Introduction
to apex programming
What is Apex programming
language?
– Apex is strongly typed
object-oriented, on-demand programming language. It is compiled, stored,
and run entirely on the Force.com platform (multi-tenant environment and is
very controlled in its invocations and limits).
– Apex syntax looks mostly like Java
and acts like stored procedures.
– Apex allows developers to attach
business logic to the record save process
– Apex has built in support for
unit test creation and execution.
As a language apex is Integrated,
Easy to use, Data focused, Rigorous, Hosted, Multitenant aware, automatically
upgradable, easy to test and versioned.
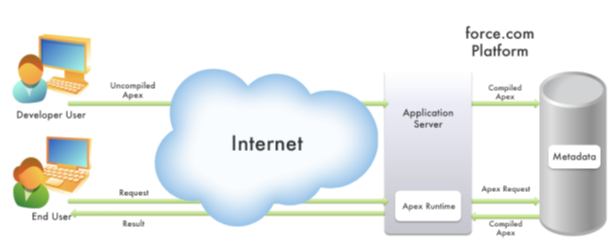
Below image helps you to understand how does apex work?
When
developers writes & saves code in platform, which is compile on force.com
platform and stores in the form of metadata in Salesforce servers. End users
can send request from UI & retrieve results from Salesforce servers.
Below
are few capabilities of Apex
– Apex provided build in support
for:
– DML calls to insert, update, and
delete record.
– Inline SOQL or SOSL statements
for retrieving records.
– Looping control structures that
help with bulk processing.
– A record locking syntax that
prevents record update conflicts.
– Custom public API calls.
– Send and receive emails.
– Web services or XML
request/response integrations.
– Warnings and errors to prevent
objects referenced by Apex from being modified.
Difference
b/w traditional code & Apex programming
Traditional code is fully
flexible, and can tell the system to do anything.
Apex is governed, can only do what
the system allows.
What
is apex class and Triggers?
Apex
Classes: It is
collection of variables and library of methods that can reused.
Apex
Trigger: It is
script that executes before or after a specific data manipulation language
(DML) event on a particular Salesforce object.
When
we can use Apex programming?
Apex should be used as a solution
when:
You need to apply complex business
logic to rows of data being saved by any means.
You need to create additional web
services API functionality for exposing logic either within Salesforce or to
external applications.
You need to call out to external
Web service and process the results.
You need to handle incoming or
outgoing emails in ways more complex than the declarative functionality.
Apex
triggers execute no matter how the triggering data is being saved.
Apex executes regardless of
whether the action originates in the user interface, through AJAX toolkit, or
from web services API.
If you only want the code to
execute through UI, consider making a visualforce page and controller.
Apex
coding basics for learners
Coding
basics:
Hope this page will help you to
understand coding basic of apex. Here in this post i will explain class,
datatypes, variables and constants.
What
is Apex class?
A class is group of variables and
methods. We can create class in salesforce in different ways. See the below
post to know about apex class.
Data types & Variables
Data types
are used to define variables and methods in classes. In Apex, all
variables & expressions have one of the below data types. Those are
– Primitive data types (Integer,
Boolean, String, …… etc.)
– Enum (an enumerated list)
– sObjects (sObject, or Account, contact, object__c….)
– Collection (list, set, map)
– Null (for the null constant. Which can be assigned to any variable.
– An object created from the user – or system-defined classes.
Primitive Data Types
Here we have
primitive data types such as Integer, Double, Long, Date, Date Time, String,
ID, and Boolean etc..
– All primitive
data types are passed by value, not by reference.
– All Apex
variables, whether they are class member variables or number variables are
initialized to null. Make sure that we initialize variables to appropriate
values before using them.
Boolean: A value that can only be assigned true,
false or null.
Example: Boolean
is Active = True;
Date: A
value that indicates a particular day. Date value contain no information
about time. Date value must always be created with a system static method.
Example: Date
dt = Date.newInstance(2014, 06, 01);
Output is
: 2014-06-01 00:00:00
Time
and Date Time: Data types associated with dates and
times along with Date data type. The time data types stores times( Year, month
and day). The date time data type stores both dates and times.
Each of these
classes has a newInstance method with which we can construct particular data
and time values.
Example: Time
t = Time.newInstance(11,30,3,3);
Output
is: 11:30:03.003Z
– we can also
create dates and times from the current clock.
Example 1:
DateTime dt = DateTime.now();
Output is
: 2014-06-01 06:29:20
Example 2: Date
dt1 = Date.today();
Output
is: 2014-06-01 00:00:00
– The date and
time classes also have instance methods for converting from one format to
another.
Time t = DateTime.now().time();
Output
is: 12:15:01.975Z
– We can also
manipulate the values by using a range of instance methods.
Date dt =
Date.today();
Date dt30 = dt.addDays(30);
Output is : dt
value = 2014-06-01 00:00:00
dt1 Value
= 2014-07-01 00:00:00
Integer: A
32 bit number that doesn’t include a decimal point. Integer has a minimum value
0f -2,147,483,648 and maximum value of 2,147,483,647.
Example: Integer
i=1;
Long: A 64 bit number that does n’t includes a
decimal point. Long has a minimum value of -2^63 and a maximum value of 2^63-1.
Example: Long L
= 2145335687L;
Double: A 64 bit number that does n’t includes a
decimal point. Long has a minimum value of -2^63 and a maximum
value of 2^63-1.
Example: Double
d=3.14159
Decimal: A
number that includes a decimal point. Decimal is
an arbitrary precision number. Currency fields are automatically
assigned the type decimal.
Example: Decimal
dec = 19.23
Null
Variables: If we declare a variable and don’t
initialize it with a value, it will be null. Null means the absence of a value.
We can also assign null to any variable declared with primitive type.
Both of below
statements result in a variable set to null.
Boolean x=null;
Decimal d;
String:
Strings are set of characters and are enclosed in single quotes. They
store text values such as a name or an address.
Example: String s1 = ‘Salesforce tutorial’
We can also
create strings from the values of other types, such as dates, by using the
string static method value of().
Apart from these
primitive data types in salesforce we have Sobject types (Salesforce object).
2. Enumerated
list or Enum data type: Enumerated list (or Enum) is
an abstract data type that stores one value of a finite set of specified identifiers.
To define Enum, use the enum keyword in the variable declaration and then
define the list of values. You can use enums to specify a set of constants.
3. sObjects:
4.
Collection data types: Three types of collection are
available in Apex
List: An ordered collection of
primitives, sObjects, collections, or Apex objects based on indices.
Set: An unordered collection of unique primitives.
Map: A collection of unique, primitive keys that map to single values which can
be primitives, sObjects, collections, or Apex objects.
salesforce
collections
We have 3 types of salesforce
collections. They are
List
Set
Map
List: List
is an ordered collection of elements which will allow duplicates.
Syntax:
List<datatype> listName = new List<datatype>();
– The datatype allows both primitive datatypes and non-primitive datatypes
– Size of the list is dynamically increased.
Methods
in List
Add: Add the values to the list.
Ex: List<String> colors =new List<String>();
colors.add(‘Red’);
colors.add(‘White’);
colors.add(‘Black’); (OR)
List<String> colors =new List<String>{‘Red’,’White’,’Black’}
Get: Retrieve a values from list using index.
String getcolor = colors.get(1); —- we get the value is ‘White’ in to getcolor
veriable.
Set: Replaces a former value with the value
at given index.
colors.set(1,’Green’); —- List has value at index ‘ 1 ‘ is White is changed to
Green.
Size: Return the number of elements in the
list.
colors.size(); —- Gives the size of colors list is ‘2’
Clear: Remove the elements from the list.
colors.clear();
Example:
Inserting 100 contacts in contacts object
public class ContactInsertion{
list<contact> contactList = new list<contact>();
public void methodName(){
for(integer i=0; i<100 ; i++ ){
contact cont = new contact(lastname = ‘contact’ + i);
contactList .add(cont);
}
insert contactList ;
}
}
– Go through the below link for the more list methods.
Set
Set is an unordered
collection of elements which will not allow duplicates.
Syntax
set<datatype> setName =
new set<datatype>();
·
data type allows only primitive datatypes and SObjects.
·
We cannot get the retrieve the data based on index because set
does not have index.
Go through the below link for
the all Set methods.
Map
Map is key – value pairs.
Syntax
map<datatype,datatype>
mapName = new map<datatype,datatype>();
·
First datatype is key and it allows primitive datatypes and
should be unique.
·
Second datatype is values and it allows both primitive &
non-primitive datatypes and allows duplicates.
Methods
Put()
Insert a key-value pair or
replaces a value with the given value for the key .
·
map.put(key,value);
Get()
Retrieves the value for a
key.
·
map.get(key);
keySet()
Retrieves all the keys and
return type is set;
·
map.keySet();
values()
Retrieves all the values and
return type is list;
·
map.values();
Size()
Return the number of
components in the map.
·
map.size();
Example: Create a map of Account
Ids and Account objects.
public class
AccountMapPopulation{
// Creating map with account
id and account object
map <Id,Account>
accountIdMap =new map<Id,Account>();
public void methodName(){
// creating the accounts
account acc1 = new account
(name =’account1′ , industry = ‘ Banking’);
account acc2 =new
account(name =’ account2′ , industry = ‘Agriculture’);
account acc3 = new
account(name=’account3′ , industry=’Banking’);
// populating the map with
account id and account object
accountIdMap
.put(acc1.id,acc1);
accountIdMap
.put(acc2.id,acc2);
accountIdMap
.put(acc3.id,acc3);
}
}
·
Go through the the below link for the more map methods.
Notes:
– Collections can have not more than 1000 elements.
– Lists and maps may contain other collections – Collections can only be nested
up to five levels deep.
– Collections do not support adding or removing elements while iterating over
the collections.
Variables
– coding basics
Static key word is used to define static variables to
store data that is shared with in the class.
– Static variables are not memory
constants.
– All instances of the same class share a single copy of static variable.
– This can be a technique used for setting flags to prevent recursive triggers.
What
is final key word?
Final key word
is used to define constants – this indicates that the variable can only be
assigned once, either in the declaration itself or with a static initializer
method if the constant is defined in the class.
Private final Integer j=10;
Class, Abstract, Implements, extends,
interface keywords in Apex
Apex Reserved keywords
1.
Class: This keyword is used to define a class.
Example:
private class MyClass {
private Integer number;
public Integer getNumber()
{
return number;
}
}
2. Abstract: This
keyword is used to define abstract classes. An abstract class that contains
methods only have signature and no body defined. Can also defined methods.
Example:
public abstract class MyAbstrtactClass {
protected void myMethod1()
{
/*… */
}
abstract Integer myAbstractMethod1();
}
3.
Implements: This keyword is used declare a class that impediments an interface.
Example:
global class CreateTaskEmailExample implements
Messaging.InboundEmailHandler {
global
Messaging.InboundEmailResulthandleInboundEmail(Messaging.inboundEmail
email,Messaging.InboundEnvelope env){
// do some work, return value;
}
}
4.
extends: Defines a class that extents another class.
Example:
public class MyClass1 extends MyClass {
}
5. interface: This
keyword is used to define a data type with method signatures. Classes implement
interfaces. An interface can extend another interface.
Example:
public interface PO {
public void doWork();
}
public class MyPO implements PO {
public override doWork() {
// actual implementation
}
}
6.
virtual: This keyword Defines a class or method that allows extension and
overrides. You can’t override a method with the override keyword unless the
class or method has been defined as virtual.
Example:
public virtual class MyException extends Exception {
// Exception class member
// variable
public Double d;
// Exception class constructor
MyException(Double d) {
this.d = d;
}
// Exception class method
protected void doIt() {}
}
public,private,protected
& global keywords
We can also call public, private, protected & global as access
modifiers. Apex allows these 4 types of modifiers.
1. public: This keyword is used to Defines a class or method or
variable that can be used by any Apex in this application or namespace.
Example:
public class Foo {
public void quiteVisible();
private void almostInvisible();
}
2. private: This key word is used to Defines a class/method/variable
that is only known locally, within the section of code in which it is defined.
This is the default scope for all methods and variables that do not have a
scope defined.
Example:
public class OuterClass {
private static final Integer MY_INT;
}
3. protected: This keyword defines a method/variable that is visible
to any inner classes in the defining Apex class.
Example:
public class Foo {
public void quiteVisible();
protected void lessVisible();
}
4.global: Defines a class, method, or variable that can be used by any
Apex that has access to the class, not just the Apex in the same application.
Example:
global class myClass {
webService static void
makeContact(String lastName) {
// do some work
}
Static, Final, this, super keywords in apex
static: This keyword defines a method/variable that is only initialized once, and is associated with an (outer) class, and initialization code. We can call static variables/methods by class name directly. No need of creating instance of a class.
Example:
public class OuterClass {
// Associated with instance
public static final Integer MY_INT;
// Initialization code
static {
MY_INT = 10;
}
}
final: This keyword is used to Defines constants and methods that can’t be overridden.
public class myCls {
static final Integer INT_CONST;
}
this: This keyword represents the current instance of a class , in constructor chaining.
Example:
public class Foo {
public Foo(String s) { /* … */}
public foo() {
this(‘memes repeat’); }
}
super: This keyword invokes a constructor on a superclass.
Example:
public class AnotherChildClass extends InnerClass {
AnotherChildClass(String s) {
super();
// different constructor, no
// args
}
}
return: This keyword returns a value from a method.
Example:
public Integer sum() {
return int_var;
}
transient: This keyword declares instance variables that cannot be saved, and should not be transmitted as part of the view state, in Visualforce controllers and extensions.
Example:
transient integer currentValue;
null: This keyword defines a null constant that can be assigned to any variable.
Example:
Boolean b = null;
if, else, do, while, for, break, continue – Key words
if: This keyword defines a condition, used to determine whether a code block should be executed.
Example:
Integer i = 1;
if (i > 0) {
// do something;
}
else: Defines the else portion of an if-else statement, that executes if the initial evaluation is untrue.
Example:
Integer x, sign;
if (x==0) {
sign = 0;
} else {
sign = 1;
}
while: This keyword executes a block of code repeatedly as long as a particular Boolean condition remains true.
Example:
Integer count=1;
while (count < 11) {
System.debug(count);
count++;
}
do: This keyword defines a do-while loop that executes repeatedly while a Boolean condition remains true.
Example:
Integer count = 1;
do {
System.debug(count);
count++;
}
for: This keyword Defines a loop. The three types of for loops are: iteration using a variable, iteration over a list, and iteration over a query.
Example:
for (Integer i = 0, j = 0; i < 10;
i++) { System.debug(i+1);
}
Integer[] myInts = new Integer[]{1,8, 9};
for (Integer i : myInts) {
System.debug(i);
}
String s = ‘Acme';
for (Account a : [SELECT Id, Name,FROM account
WHERE Name LIKE :(s+’%’)]) {
// Your code
}
break: This keyword Exits the entire loop.
Example:
while(reader.hasNext()) {
if (reader.getEventType() == END) {
break;
};
// process
reader.next();
}
continue: This keyword Skips to the next iteration of the loop.
Example:
while (checkBoolean) {
if (condition)
{continue; }
// do some work
}
===========================================
Database Manipulation
operations – insert, update, upsert, delete, undelete & merge:
Below are the different database manipulation languages in apex.
insert: This keyword is used to insert one or more records. See the
below example to understand how can we use this in apex code.
Example:
Lead l = new Lead(Company=’ABC’,LastName=’Rahul’);
insert l;
update: This keyword is used to update/modifications to the existing
records. See the below example to understand how can we use this in apex code.
Example:
Account a = new Account(Name=’MyAcc1′);
insert a;
Account myAcct = [SELECT Id, Name, BillingCity FROM Account WHERE Name
= ‘MyAcc1′ LIMIT 1];
myAcct.BillingCity = ‘Melbourne';
try {
update myAcct;
} catch (DmlException e) {
}
upsert: This keyword is used to creates/insert new records and updates
existing records. See the below example to understand how can we use this in
apex code.
Example:
Account[] acctsList = [SELECT Id, Name, BillingCity FROM Account WHERE
BillingCity = ‘Bombay’];
for (Account a : acctsList)
{a.BillingCity = ‘Mumbai';}
Account newAcct = new Account(Name = ‘Ramco’, BillingCity =
‘Hyderabad’);
acctsList.add(newAcct);
try {
upsert acctsList;
}
catch (DmlException e) {
}
delete: This key word is used to delete the records.
Example:
Account[] delAccts = [SELECT Id, Name FROM Account WHERE Name =
‘domnos’];
try {
delete delAccts;
} catch (DmlException e) {
// Process exception here
}
undelete: This keyword is used to restore the records from the
recyclebin.
Example:
Account[] accts = [SELECT Id, Name FROM Account WHERE Name = ‘myAcc’
ALL ROWS];
try {
undelete accts;
}
catch (DmlException e) {
}
Merge: This keyword merges up to three records of the same type into
one of the records, deleting the others, and re-parenting any related records.
Example:
List<Account> accList = new List<Account>{new
Account(Name=’Myacc1′),new Account(Name=’MyAcc2′)};
insert accList;
Account masterAcct = [SELECT Id, Name FROM Account WHERE Name =
‘Myacc1′ LIMIT 1];
Account mergeAcct = [SELECT Id, Name FROM Account WHERE Name =
‘MyAcc2′ LIMIT 1];
try {
merge masterAcct mergeAcct;
}
catch (DmlException e) {
}
=================================================
SOQL
(Salesforce object Query Language)
SOQL:
– SOQL (Salesforce
object Query Language) retrieves the records from the database by using
“SELECT” keyword.
– By using SOQL, we can
know in which object or fields the data resides.
– We can retrieve the
data from single object or from multiple objects that are related to each
other.
– SOQL uses the SELECT
statement combined with filtering statements to return sets of data, which may
optionally be ordered:
SELECT one or
more fields
FROM an object
WHERE filter
statements and, optionally, results are ordered
SOQL query is enclosed between
square brackets. The following query retrieves a record from database that has
the name field value equal to “Airway”.
Account
a = [Select ID, Name from Account where Name=’acc1′];
In the above query “a”
variable stores the ID, Name of the all accounts with name “acc1”
– SOQL statements
evaluate to a list of SObject records, single SObject records or an integer for
count method quires.
Querying
Single SObject records: Below query gets single account record with given ID.
Account a = [Select Name
from Account where ID=’XXXXXXXXXXXX’];
Querying
List of Sobjects records: Following example is to display list of account.
//
querying list of records and stores in list variable “acc”
List<Account>
acc = [Select Name from Account where industry = ‘education’];
System.debug(‘Size:
‘+acc.size()); // displays size of the list
for(Integer
i=0; i<=acc.size();i++)
{
System.debug(‘Size:
‘+acc[i].Name); // To display accounts stored in
“acc”
}
Below query gets number of
record in an object.
Integer
i = [Select count() from Account where industry=’education’];
System.debug(‘Count:
‘ + i);
Relationship
Queries in salesforce
Using relationship queries, we can
retrieve the related objects data using the SOQL query.
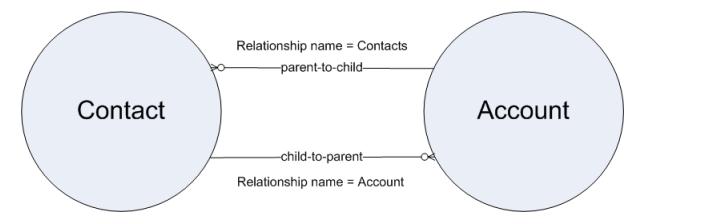
Parent-to-child and child-to-parent relationships exist between many types
of objects, for example, Account is a parent of
Contact.
Below diagram display relationship between Account and Contact.
To be able to traverse these
relationships for standard objects, a relationship name is given to each
relationship. The form of
the name is different, depending on the direction of the relationship:
child-to-parent relationship:
For child-to-parent
relationships, the relationship name to the parent is the name of the foreign
key, and there is a
relationshipName property that holds the reference to the parent object. For
example, the Contact child object has a
child-to-parent relationship to the Account object, so the value of
relationshipName in Contact is Account. These
relationships are traversed by specifying the parent using dot notation in the
query, for example:
In the child to parent
relationship, we can query on contact and retrieves the values from account
that is associated.
Contact
c = [Select First Name, Last Name, Account.Name, Account.Industry from contact
where id = ‘XXXXXXXX’];
System.debug(‘Account
Name: ‘ + c.Account.Name);
System.debug(‘Industry:
‘ + c.Account.Industry);
Parent-to-child relationship:
For parent-to-child
relationships, the parent object has a name for the child relationship that is
unique to the parent, the
plural of the child object name. For example, Account has child relationships
to Assets, Cases, and Contacts among other objects, and has a relationshipName
for each, Assets, Cases, and Contacts.These relationships can be traversed only
in the SELECT clause, using a nested SOQL query. For example:
In the parent -to-child
relation, we can query on the parent object and we will get details about child
record.
Account
a = [Select Name, (Select Contact.FirstName, Contact.LastName from
Account.Contacts) from account where id = ‘XXXX’];
System.debug(‘Name:’+
a.name );